Create new project
Before implementing any Web3Auth SDK, developers must create a new project in the Web3Auth Dashboard. This process generates a Client ID required for Web3Auth SDK integration.
It is recommended to maintain separate projects for different environments (e.g., development, staging, production) to ensure optimal security of credentials.
Create a new project
Login to the Web3Auth Dashboard and create a new project if you haven't already.
Get the Client ID
After creating a project, navigate to Project Settings and select the General tab to obtain
the Client ID.
The project comes pre-configured with default connections, chains and networks to facilitate faster integration with Web3Auth SDK.
For detailed implementation steps, developers can refer to the Quickstart Guide to integrate Web3Auth SDK into their applications.
For a comprehensive understanding of the dashboard functionality, the following sections provide detailed coverage of all available features.
Understanding the Dashboard
Web3Auth Dashboard allows developers to manage their projects, configure chains and networks, authentication connections, and customize the user experience.
Project Settings
The Project Settings section of the Web3Auth Dashboard allows developers to manage core configuration options for each project. These settings determine how the project integrates with the Web3Auth SDK and how it behaves across different environments.
General
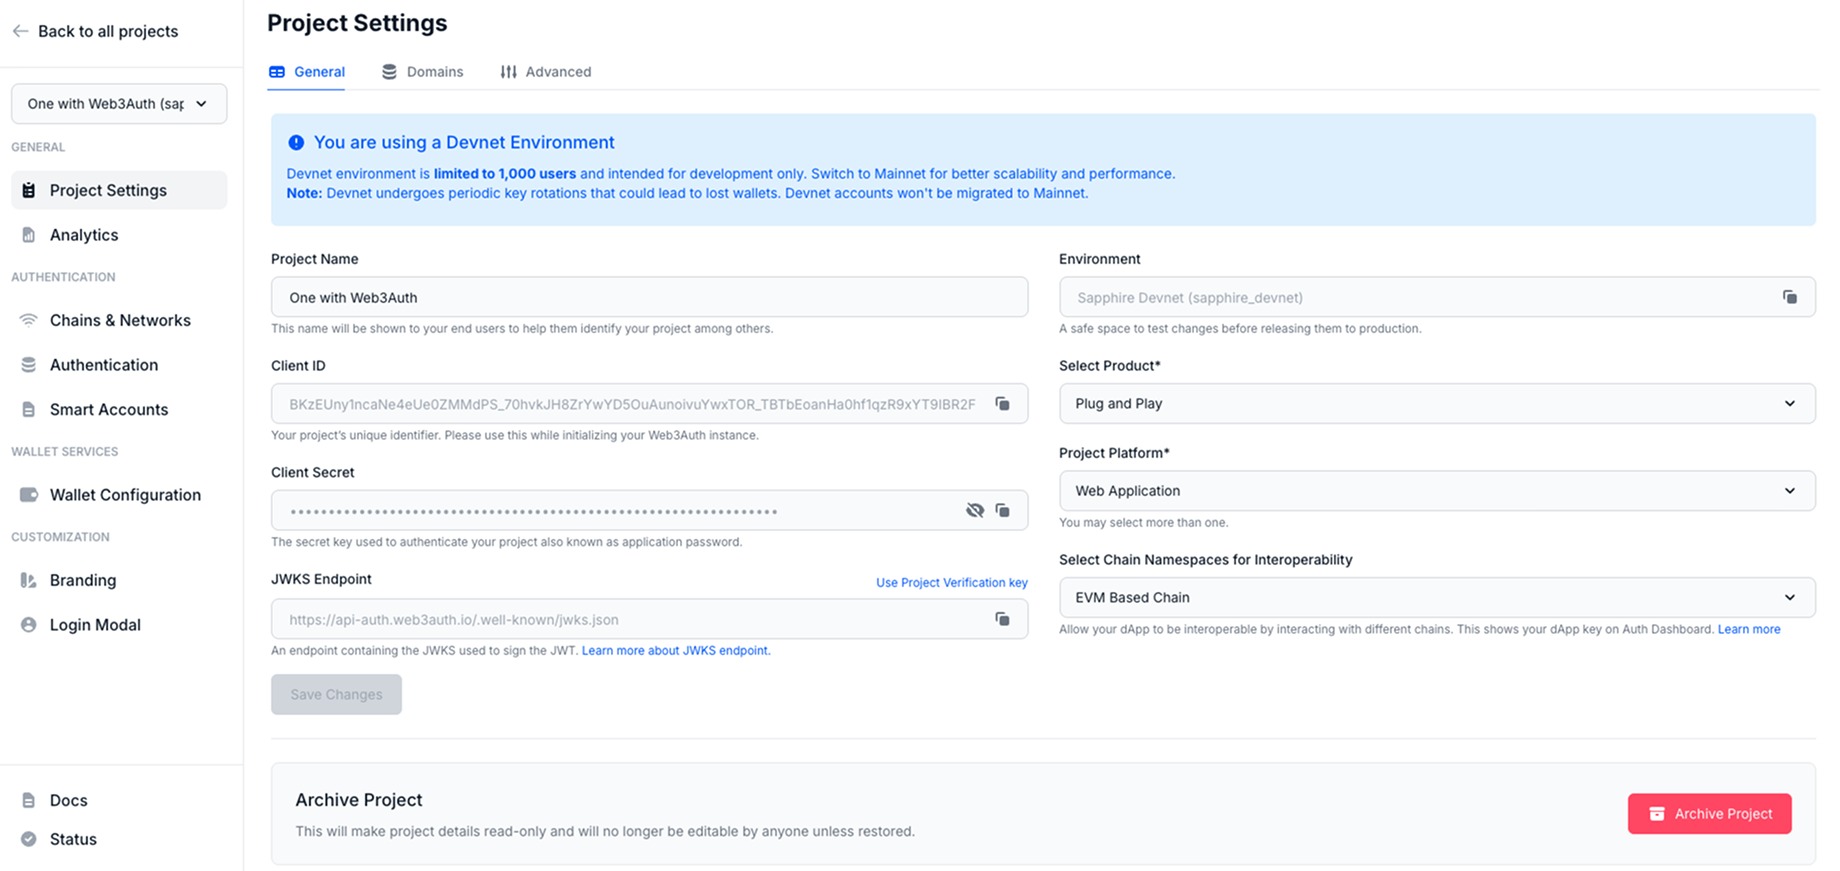
The General tab provides an overview of key project-specific parameters:
- Project Name: This is the name of the project that will be displayed to users during the Web3Auth login flow and in any related email communication. The name can be updated post-creation at any time.
- Environment: This indicates the Web3Auth environment (devnet or mainnet) selected during project creation. These environments are globally distributed and highly scalable. Once set, the environment cannot be modified.
- Client ID: A unique identifier automatically generated for each project. This value is required for SDK integration and is safe to expose publicly.
- Client Secret: A confidential key used for authenticating server-side API requests. It should never be exposed to the frontend or any client-side environment to maintain security.
- JWKS Endpoint: A public endpoint that exposes the JSON Web Key Set (JWKS) used by Web3Auth to sign JWTs. Developers can use this endpoint to verify identity tokens. Learn more.
- Project Verification Key: An alternative to using the JWKS endpoint. This static key allows for token verification without depending on the JWKS URL. Learn more.
- Project Platform: Developers can select from a wide range of platform options such as Web, Mobile, or Gaming, depending on the nature of the application.
Archive Project
The Archive Project button allows developers to archive a project. Once archived, the project becomes read-only and cannot be modified unless explicitly restored.
Whitelist Domains
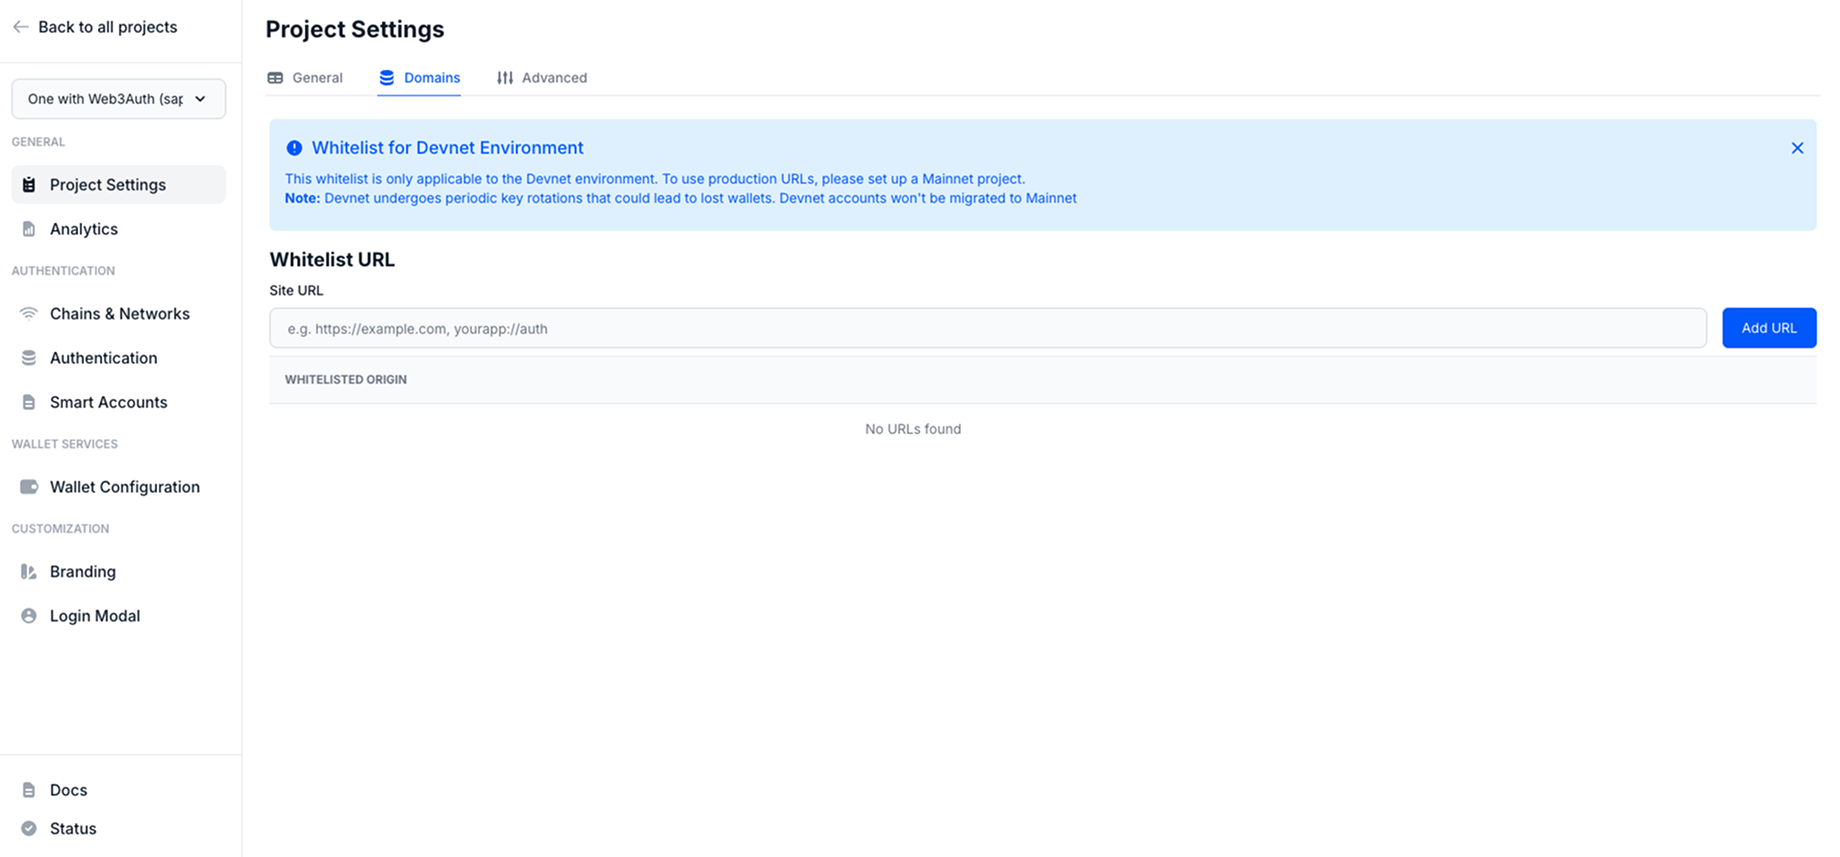
To enhance security, Web3Auth enables domain whitelisting for both web and mobile applications.
-
Domain Authorization Developers must add and verify URLs that are authorized to use the Web3Auth SDK.
For mainnet projects, at least one domain or URL must be whitelisted before the SDK can be used in production.
Advanced
The Advanced tab provides developers with additional configuration options to fine-tune authentication behavior, session control, and data privacy.
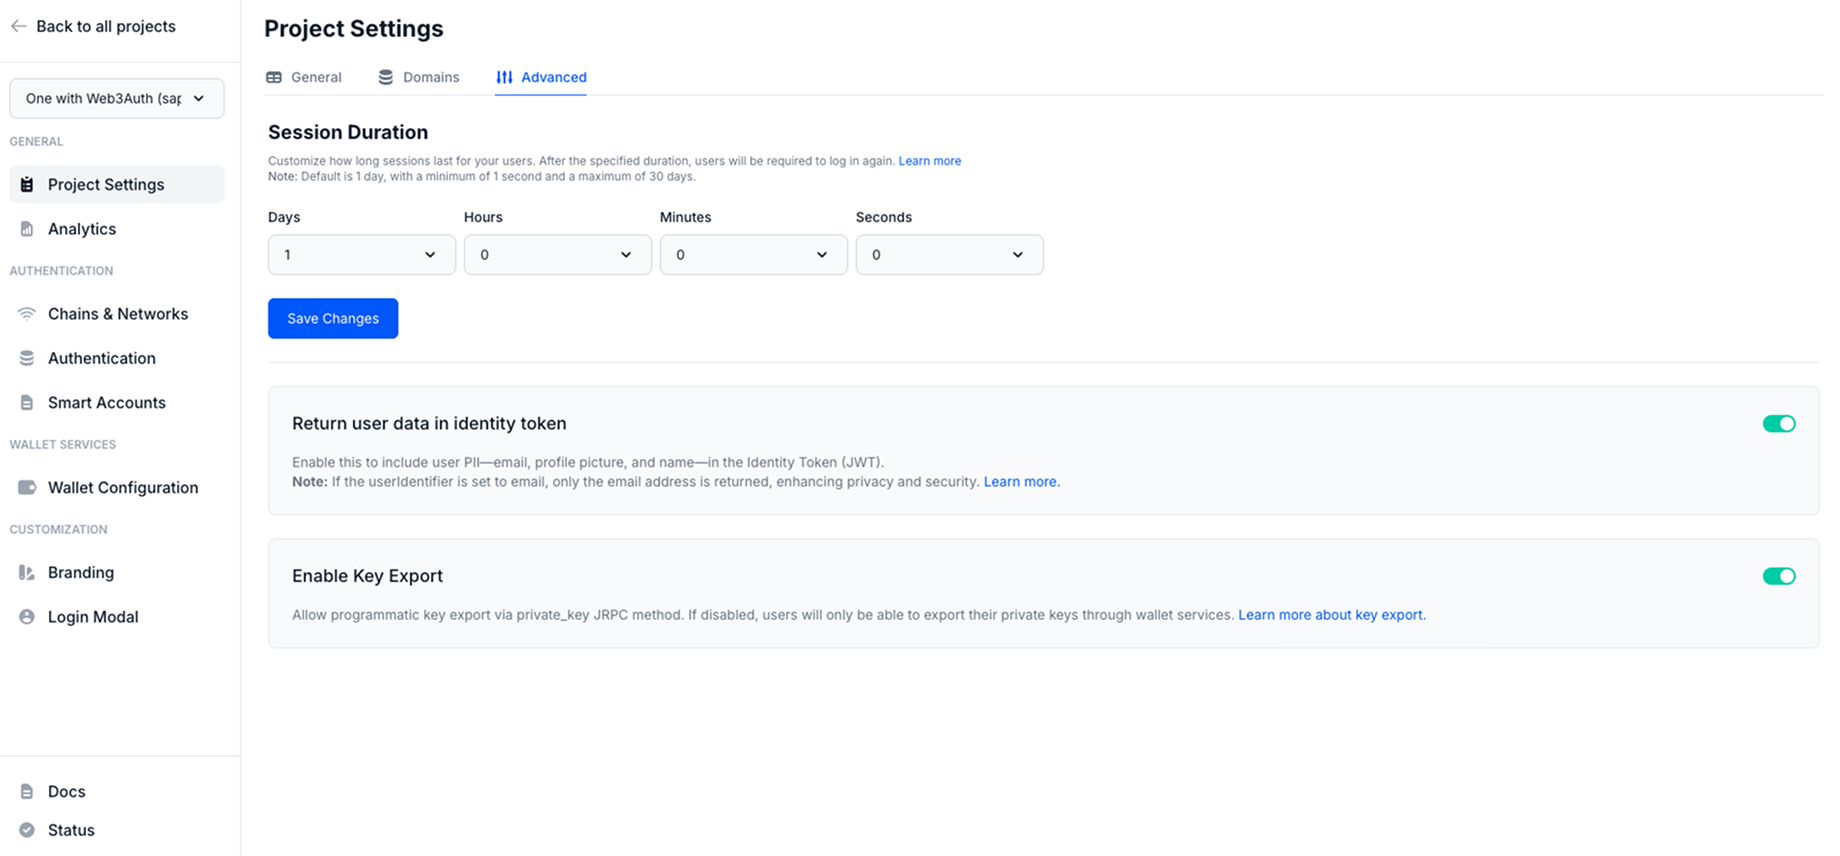
Session Duration
Web3Auth allows customization of session lifetime:
- Developers can configure how long a user session remains active before requiring re-authentication.
- The default session duration is 1 day.
- Minimum configurable duration is 1 second, while the maximum is 30 days.
This setting is particularly useful for balancing security and user experience. Shorter durations increase security by reducing exposure, while longer durations improve usability for trusted applications.
Return User Data in Identity Token
This option determines whether Personally Identifiable Information (PII)—such as the user’s email, profile picture, and name—is returned in the JWT identity token issued by Web3Auth.
- Enabling this setting allows applications to access additional user metadata directly from the identity token.
- If userIdentifier is set to email, only the user’s email will be returned in the token. This provides a privacy-centric approach to user identity management.
Why this matters: Including user PII in the JWT can streamline user onboarding, personalization, and session management in your application. However, developers must consider user consent, data minimization, and jurisdictional privacy regulations (such as GDPR or CCPA) before enabling this option. Only request what is essential for your application’s functionality.
Enable Key Export
This setting allows developers to control whether users can programmatically export their private keys using the Web3Auth SDK.
- When enabled, the application can allow users to retrieve their private key. For this, the dApp
must use the
eth_private_keyJSON-RPC method. - When disabled, users will only be able to export their keys manually via Web3Auth’s built-in wallet interface.
This functionality is crucial for advanced use cases such as migration, backup, or interoperability with non-EVM-compatible blockchains.
Example: Programmatically retrieving the private key after login:
// Assuming user is already logged in
async function getPrivateKey() {
  const privateKey = await web3auth.provider.request({
    method: "eth_private_key",
  });
}
Chains and Networks
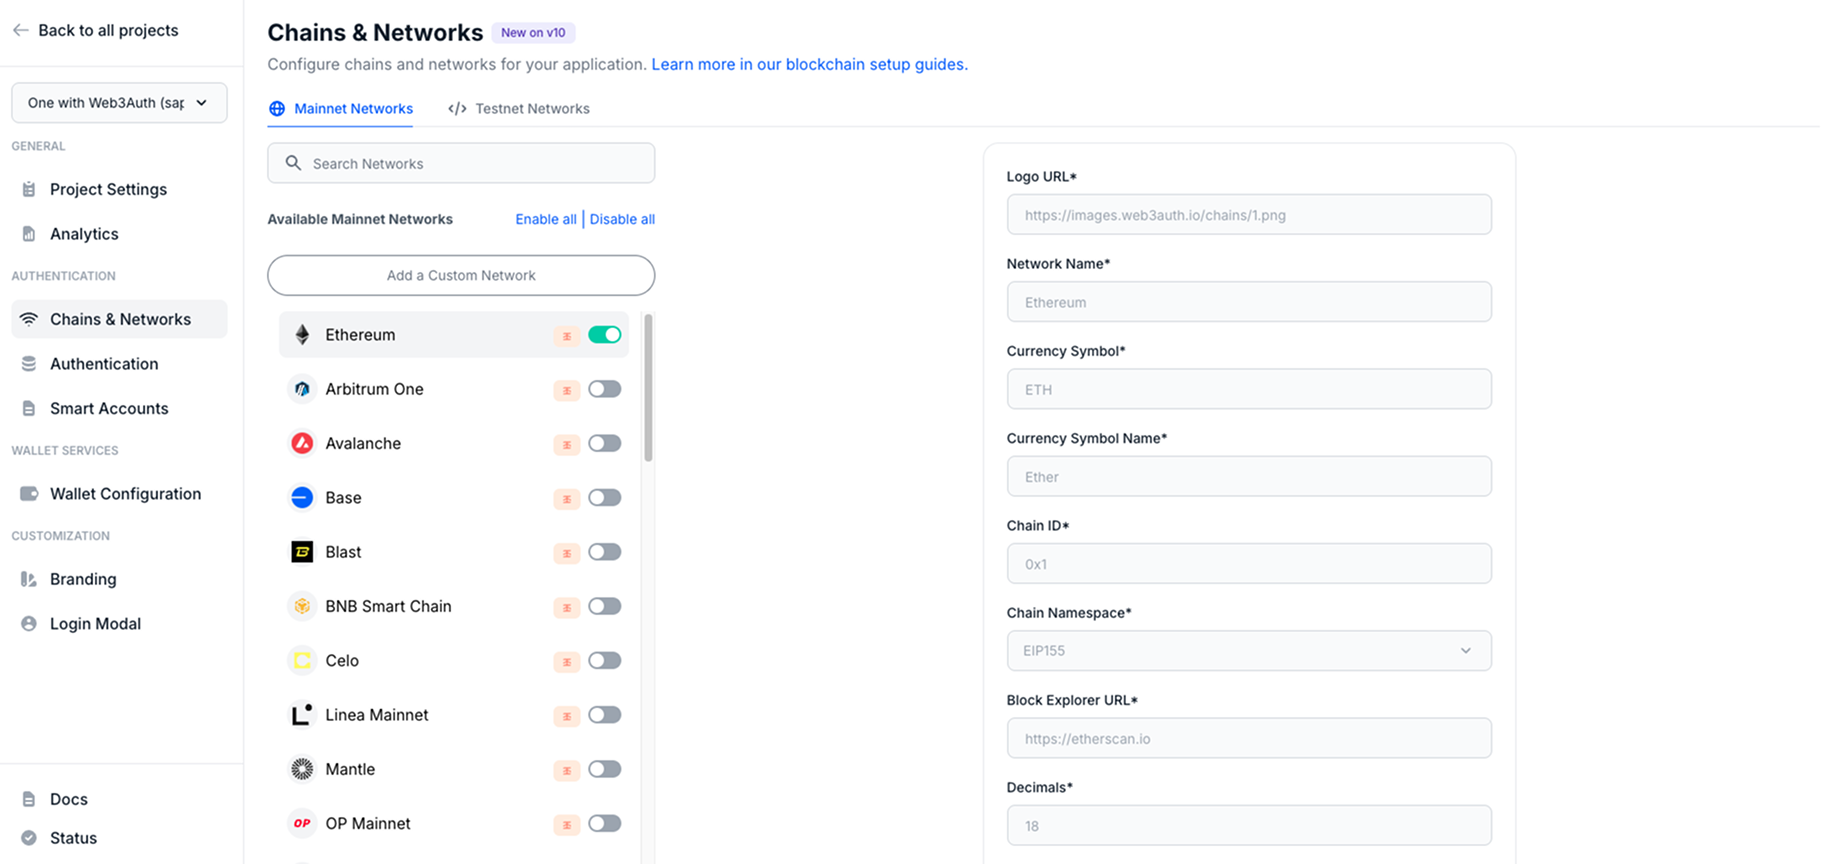
Web3Auth simplifies blockchain configuration with a no-code approach to managing chains and networks directly from the dashboard. Developers can enable or disable mainnet and testnet networks with a single click—no need to write or manage chain-related code within the SDK.
The interface offers an extensive list of popular blockchains including Ethereum, Arbitrum, Avalanche, Base, and more. Custom networks can also be added effortlessly by filling in essential details like Chain ID, Currency Symbol, Block Explorer URL, and Namespace.
This intuitive setup ensures seamless integration and flexibility, allowing developers to focus on building without worrying about manual chain configuration.
Authentication
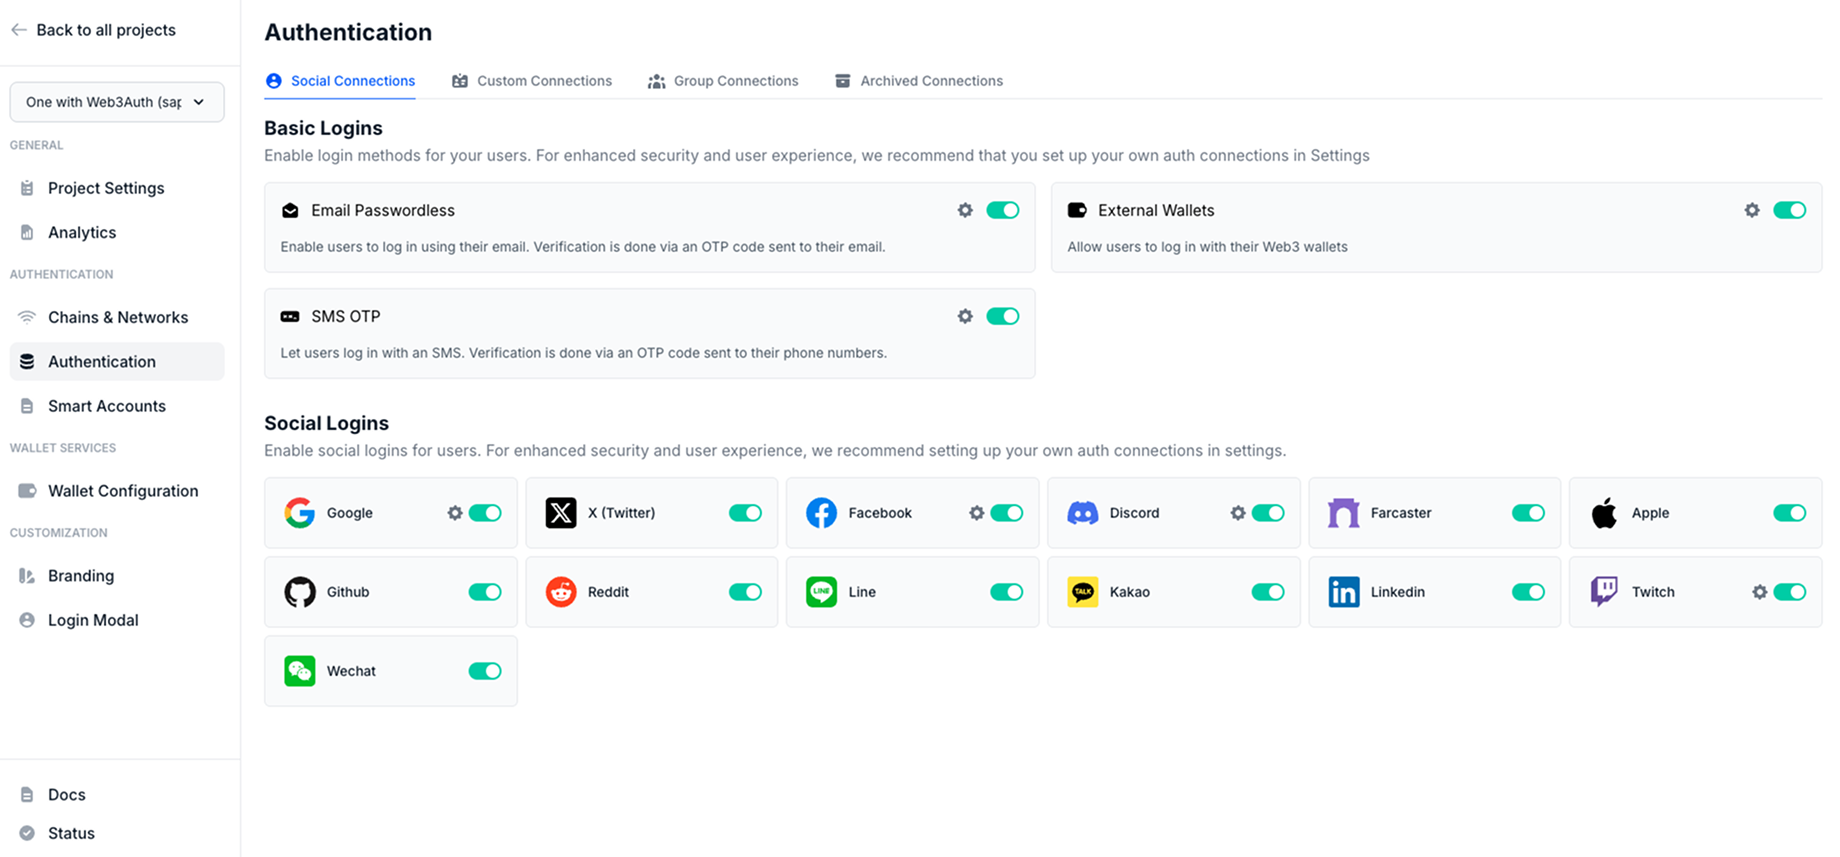
If you plan on using Web3Auth for user onboarding, you'll need to configure the login methods you want to use in your app. All client SDKs require at least one login method to be enabled, by default, all login methods are enabled.
Follow the steps here to set up different options for your users!
Wallet Services
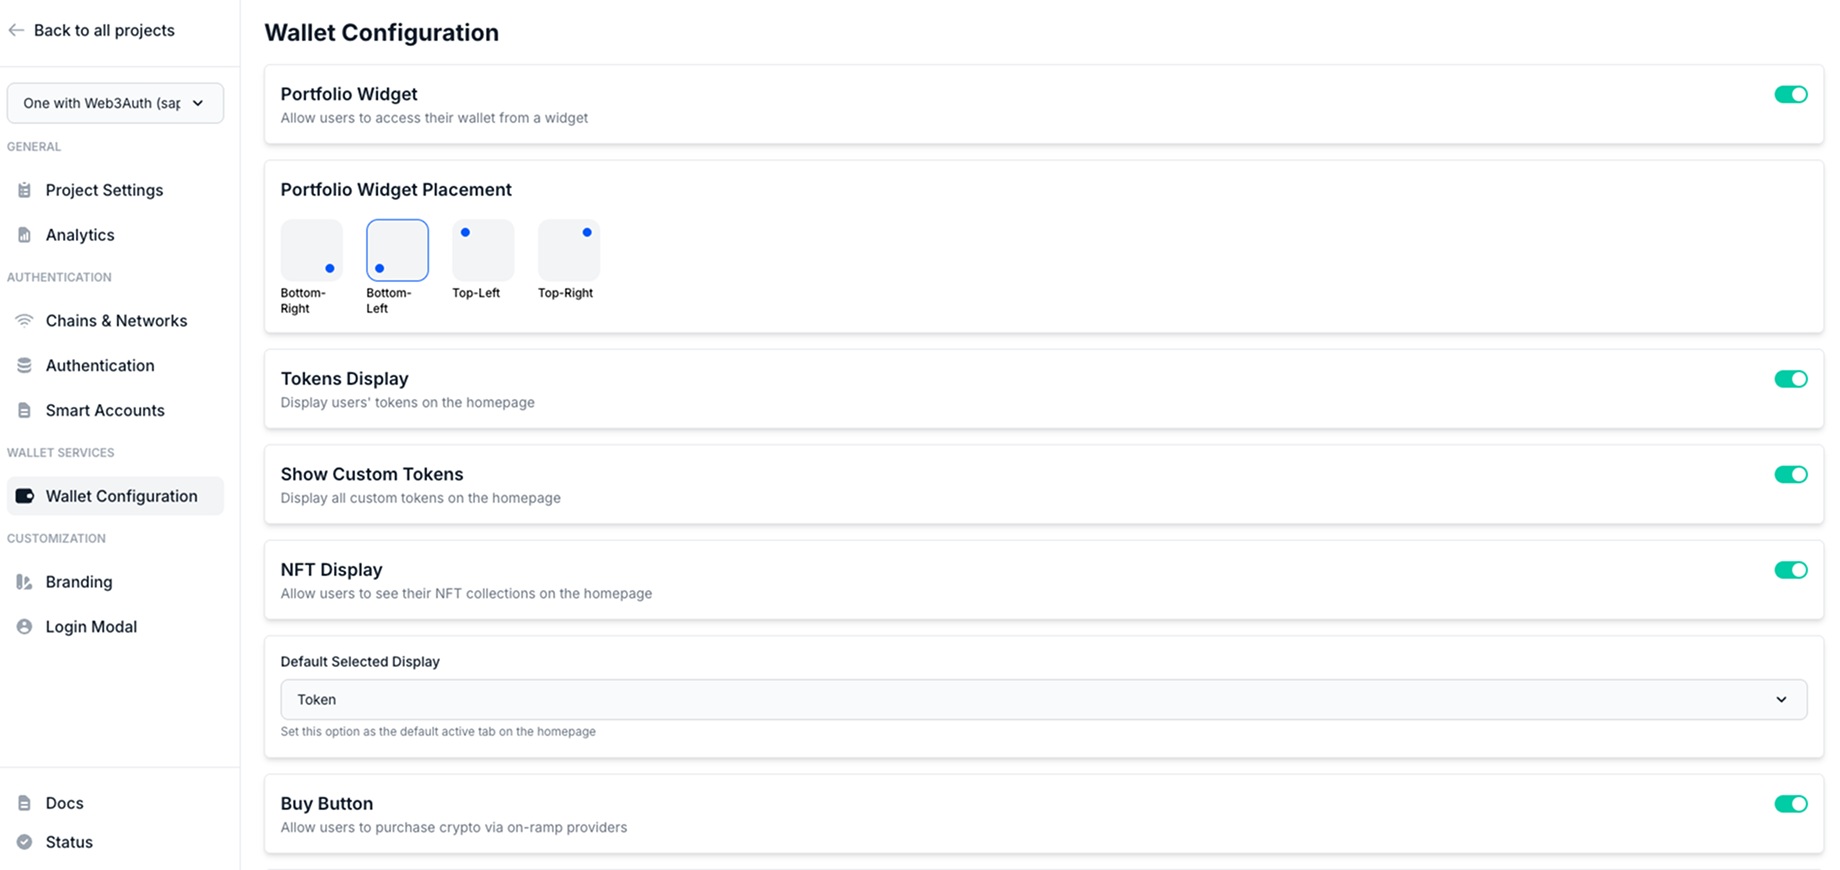
The Wallet Configuration tab within the Web3Auth Dashboard enables developers to customize the wallet experience provided to users within their decentralized applications (dApps). These settings define the appearance, capabilities, and interactivity of the Web3Auth wallet interface.
Customize Wallet UI
The Wallet UI can be tailored to align with the application’s user experience and branding preferences. The following customization options are available:
-
Portfolio Widget
Enable or disable the portfolio widget that displays token balances, transaction history, and wallet analytics. This provides users with a clear overview of their holdings directly within the dApp.
-
Widget Placement
Choose the position of the wallet widget on the application interface. Available positions include:
- Bottom Right
- Bottom Left
- Top Left
- Top Right
This flexibility ensures seamless integration with your existing UI/UX design.
-
Token and NFT Display
Configure whether users can view their token balances and NFTs within the wallet interface. Enabling these options enhances the wallet’s functionality, offering users visibility into their digital assets without leaving the dApp.
-
Wallet Features:
Toggle individual wallet actions such as:
- Buy: Allow users to purchase crypto assets via integrated on-ramps.
- Swap: Enable in-wallet token swaps through supported liquidity protocols.
- Send / Receive: Facilitate peer-to-peer asset transfers.
- WalletConnect: Add interoperability by allowing users to connect with external dApps that support WalletConnect protocol.
-
Transaction Confirmation Modal
When enabled, users will be prompted to approve each transaction via a confirmation modal. This mirrors the behavior of traditional external wallets (e.g., MetaMask), offering an additional layer of transparency and user control over on-chain interactions.
Note: These wallet services are fully integrated and require no additional SDK logic—configuration through the dashboard is sufficient to apply changes across your application.
These customization options ensure that developers can build a wallet experience that meets both usability and security expectations while maintaining consistency with their application’s design.
Customization
Branding
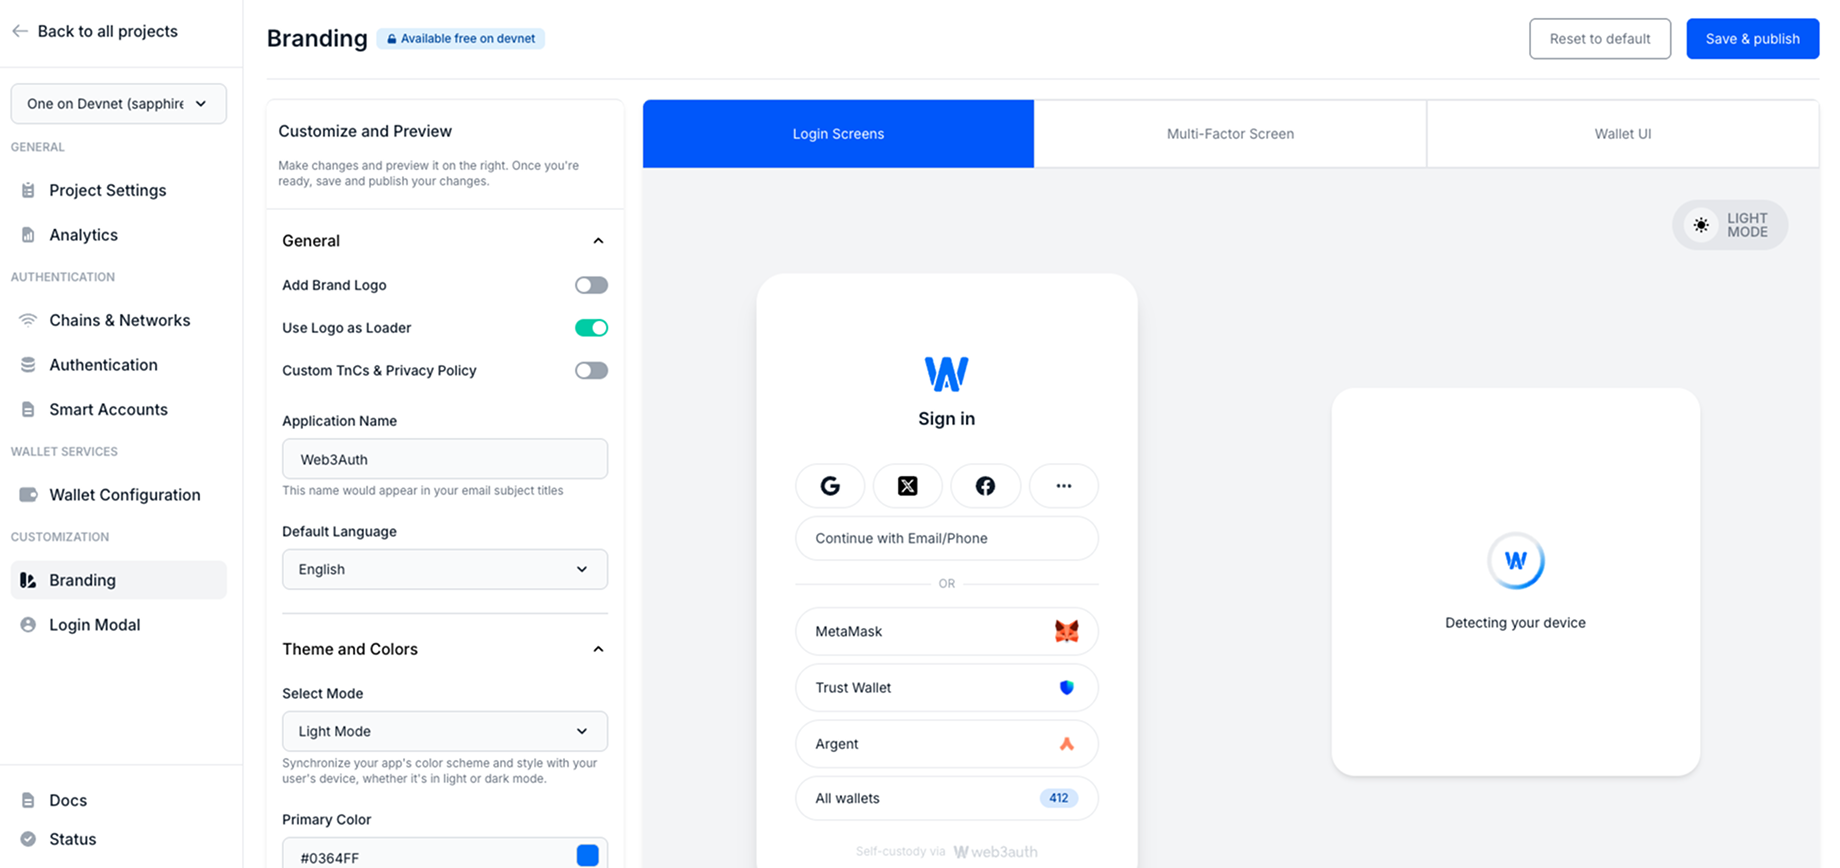
The Branding tab under the Customization section of the Web3Auth Dashboard allows developers to personalize the visual identity of their application across multiple user interfaces. This includes the Login Screens, Multi-Factor Authentication (MFA) screens, Wallet UI, and Login Modals.
Effective branding ensures a seamless and recognizable user experience, helping users feel confident that they are interacting with your application—even when interacting with Web3Auth-hosted interfaces.
Note: All changes made within the Branding tab can be previewed in real-time. However, to reflect updates in production, developers must click the Save & Publish button after making changes.
Branding Options
-
Add Brand Logo
Upload a logo to personalize the user interface and email templates. For optimal performance and compatibility, it is recommended to use a .png file. The logo appears across login flows, wallet views, and email communications.
-
Use Logo as Loader
Developers have the option to display the uploaded logo as the loading spinner across the Web3Auth login flow. This small detail enhances brand consistency and gives users a familiar visual cue during authentication.
-
Custom Terms & Conditions and Privacy Policy
Link to your application’s Terms of Service and Privacy Policy. These links will be displayed during user onboarding and consent flows, ensuring legal compliance and improving transparency.
-
Application Name
The name defined here will be used across system-generated communication, including the subject lines of email templates. Ensure that the application name clearly represents your project or organization.
-
Default Language
Select the default localization for all user-facing Web3Auth components. Supported languages include:
- English
- Japanese
- Korean
- German
- Mandarin
- Spanish
- French
- Portuguese
- Dutch
- Turkish
This setting ensures that your application’s authentication flow is accessible and intuitive for users across different regions.
Theme and Colors
The Theme and Colors section allows developers to synchronize the aesthetic of the Web3Auth interfaces with the branding and design system of their application.
-
Select Mode
Choose between Light, Dark, or Auto mode. When Auto is selected, the interface adapts to the user’s
system theme preference automatically. This ensures a consistent and user-friendly visual experience, regardless of the device or OS settings.
-
Primary Color
Defines the primary brand color used across interactive elements such as:
- Buttons
- Hyperlinks
- Tab indicators
- Focus outlines
- Loaders and spinners
- Navigation tabs
-
On Primary Color
Specifies the color applied to text and icons that appear on top of primary color backgrounds (e.g., button labels or iconography). This ensures sufficient contrast for readability and accessibility.
Tip: Choose color combinations that meet accessibility guidelines (e.g., WCAG) to provide an inclusive experience for all users.
Login Modal
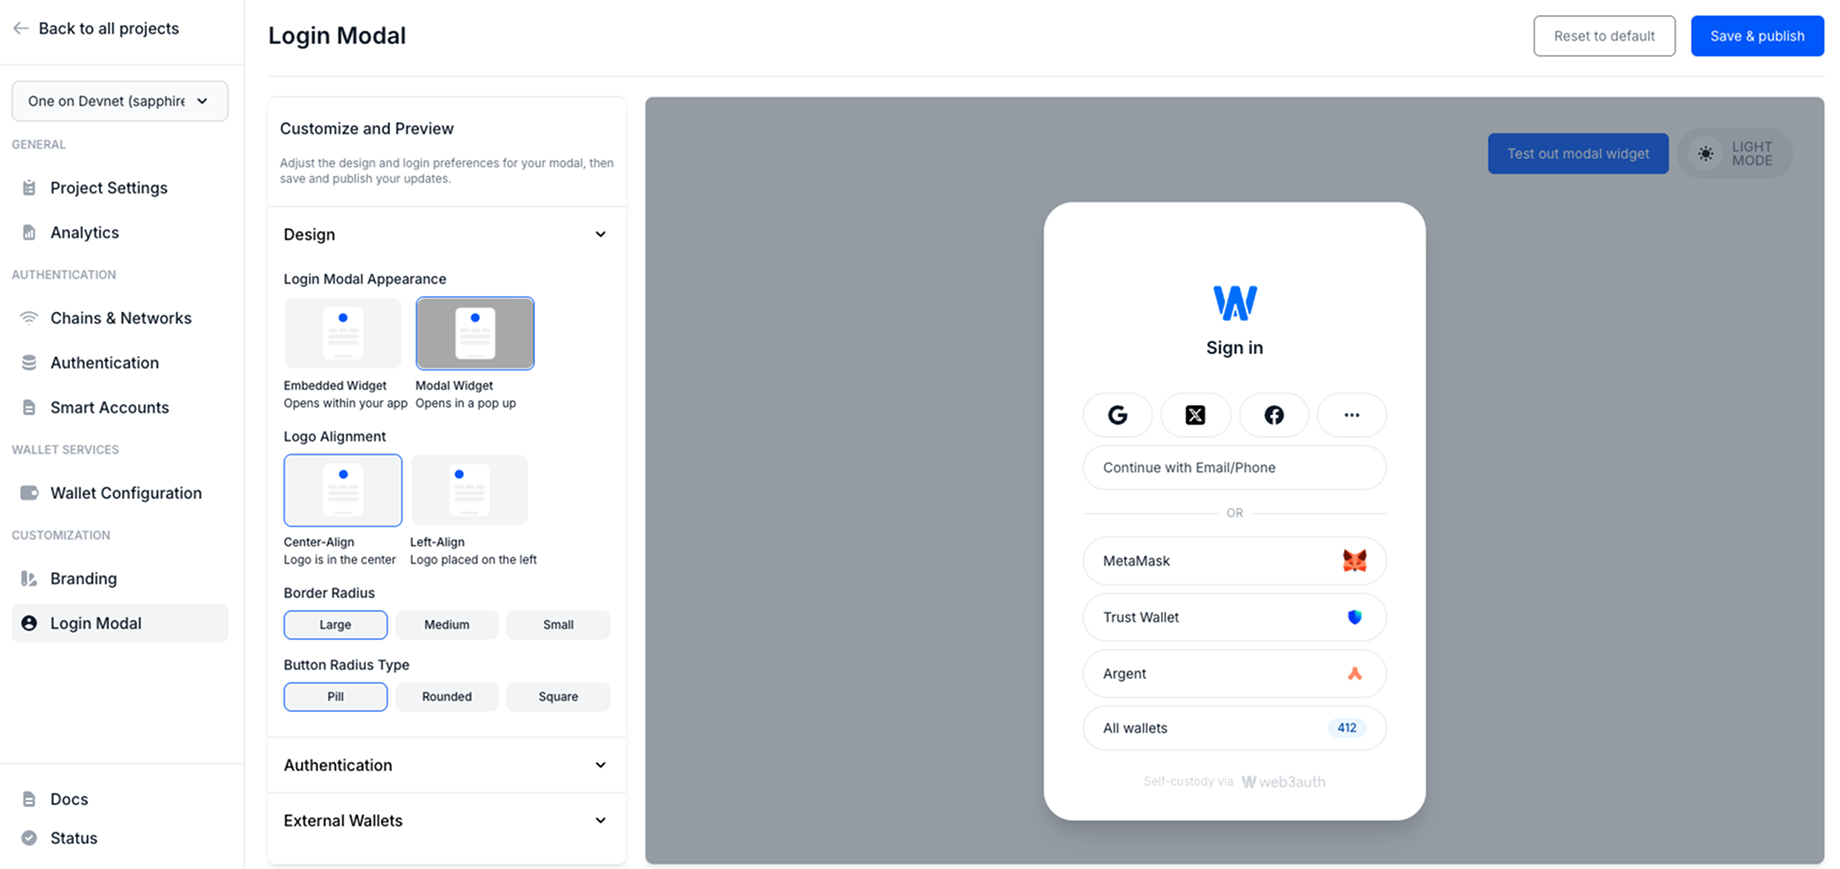
The Login Modal tab within the Customization section of the Web3Auth Dashboard provides developers with granular control over the appearance and behavior of the Web3Auth login flow.
Design
The Design section offers layout and styling options to customize how the login modal is presented to users.
-
Login Modal Appearance
Developers can choose between two display modes for the login interface:
-
Embedded Widget: The login UI is embedded directly within the application’s layout. This option is ideal for single-page applications or flows that require a fully integrated experience.
-
Modal Widget: The login interface opens as a pop-up modal overlay. This provides a more traditional Web3 wallet experience, where authentication occurs in a floating layer over the existing content.
-
-
Logo Alignment
Configure how the application logo is aligned within the login modal:
- Center-Aligned: Displays the logo at the top center, suitable for balanced layouts.
- Left-Aligned: Positions the logo to the top-left, often preferred for enterprise or dashboard-style applications.
-
Border Radius
Adjust the corner curvature of the modal interface:
- Small, Medium, or Large radius options allow for stylistic variations that better match your app’s design system.
-
Border Radius Type
Refine the shape of buttons and input fields within the modal by selecting:
- Pill: Fully rounded ends for a modern, soft appearance.
- Rounded: Gently curved corners for a subtle aesthetic.
- Square: Sharp 90° corners for a more technical or minimalist look.
These design customizations allow developers to ensure the login experience feels native to the application, enhancing user trust and engagement.
Authentication re-order
The Authentication section provides flexibility in how login options are presented within the modal.
-
Arrange Login Order
When multiple login methods (e.g., social, email/phone, external wallets) are available, developers can define the order in which these options appear.
-
Simply drag and drop the login methods to rearrange their position.
-
This order determines the priority and placement of login options shown to users during authentication.
Note: This customization improves user experience by surfacing the most relevant login methods first—e.g., placing a company-preferred SSO or social login provider at the top.
-
External Wallets
The External Wallets settings provide additional configuration for displaying third-party wallet options such as MetaMask, WalletConnect, and others.
-
Show Installed External Wallets
Enable this to automatically detect and display any compatible wallets already installed in the user’s browser or device (e.g., MetaMask or Phantom). This improves onboarding by surfacing options users are already familiar with.
-
Show Number of External Wallets
Choose how many external wallet options are displayed at once. Developers can limit or expand this list based on the target user base and the types of wallets they are likely to use.
These settings ensure wallet integrations are both comprehensive and context-aware, adapting to the environment and user preferences for seamless onboarding.
Analytics
The Project Analytics section in the Web3Auth Dashboard provides developers with a comprehensive overview of user activity and project engagement. This analytics system gathers and visualizes key data points to help developers monitor authentication trends, evaluate project performance, and make informed decisions to enhance user experience.
By offering visibility into user behavior and system usage, analytics empowers teams to optimize authentication flows, track growth, and ensure the platform’s reliability at scale.
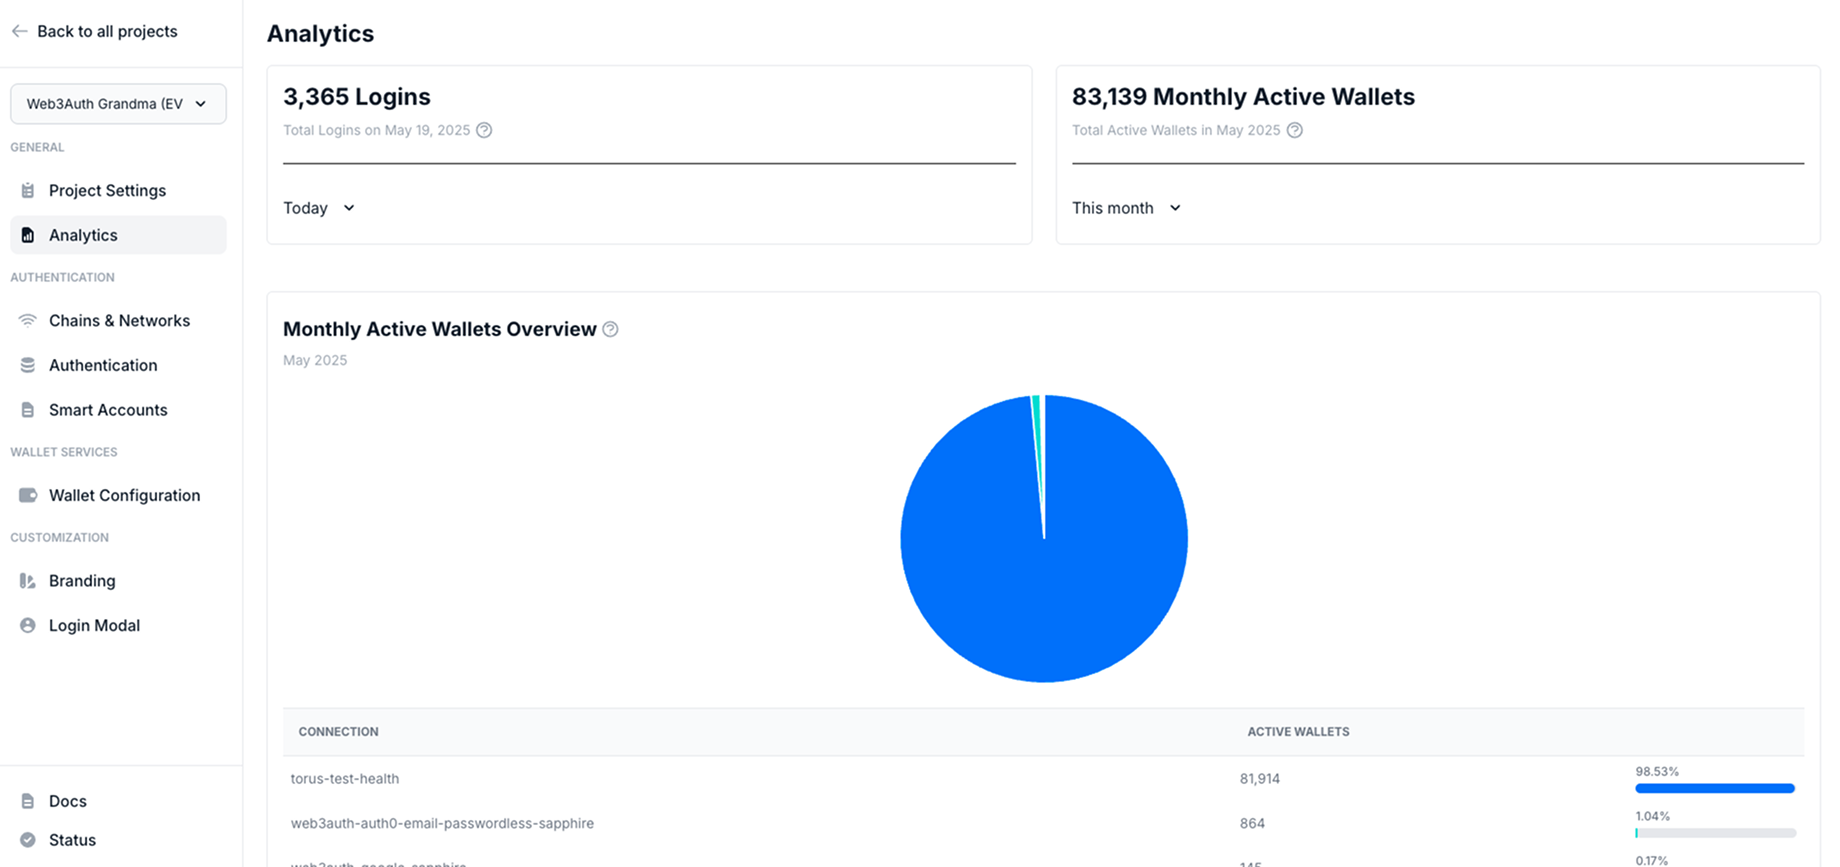
Key Metrics and Insights
-
Total Logins
Displays the cumulative number of login events across the project. This metric helps developers gauge overall user activity and identify spikes or patterns in login frequency.
-
Monthly Active Wallets (MAWs)
Reflects the number of unique wallets that have interacted with the application within a given month. This is a critical metric for tracking user retention and engagement over time.
-
Monthly Active Wallets Overview
A visual breakdown of MAWs is presented in the form of a pie chart. This chart provides a quick snapshot of wallet activity distribution, highlighting the proportion of users by wallet type or authentication method.
-
Connections Used
Lists the types of authentication connections utilized across the project—such as social logins, passwordless methods, and external wallets—giving insight into the preferred login flows.
Note: Project Analytics offers high-level visibility as well as drill-down insights, making it a powerful tool for both technical teams and product managers looking to refine onboarding and user authentication strategies.